6E0C4A
SWELLDONEWorkout Builder
Create your own custom workouts for Swelldone
Create your own custom workouts for Swelldone
0
{
"name": "9x10 minutes",
"duration": "Long",
"description": "9x10 min",
"email": "",
"exercises": [
{
"name": "Round 1",
"type": "Intervals - Zone",
"effort": "80% Effort",
"power1": 80,
"distance1": 0,
"duration1": 180,
"rest_effort": "65% Effort",
"power2": 65,
"distance2": 0,
"duration2": 120,
"repeat": 2
},
{
"name": "Rest 1",
"type": "Free Row/Paddle",
"effort": "Select...",
"power1": 0,
"distance1": 0,
"duration1": 60,
"rest_effort": "Select...",
"power2": 0,
"distance2": 0,
"duration2": 0,
"repeat": -1
},
{
"name": "Round 2a",
"type": "Intervals - Zone",
"effort": "65% Effort",
"power1": 65,
"distance1": 0,
"duration1": 120,
"rest_effort": "95% Effort",
"power2": 95,
"distance2": 0,
"duration2": 60,
"repeat": 0
},
{
"name": "Round 2b",
"type": "Intervals - Zone",
"effort": "80% Effort",
"power1": 80,
"distance1": 0,
"duration1": 120,
"rest_effort": "80% Effort",
"power2": 80,
"distance2": 0,
"duration2": 60,
"repeat": 0
},
{
"name": "Round 2c",
"type": "Intervals - Zone",
"effort": "65% Effort",
"power1": 65,
"distance1": 0,
"duration1": 120,
"rest_effort": "95% Effort",
"power2": 95,
"distance2": 0,
"duration2": 60,
"repeat": 0
},
{
"name": "Round 2d",
"type": "Intervals - Zone",
"effort": "80% Effort",
"power1": 80,
"distance1": 0,
"duration1": 30,
"rest_effort": "80% Effort",
"power2": 80,
"distance2": 0,
"duration2": 30,
"repeat": 0
},
{
"name": "Rest 2",
"type": "Free Row/Paddle",
"effort": "Select...",
"power1": 0,
"distance1": 0,
"duration1": 60,
"rest_effort": "Select...",
"power2": 0,
"distance2": 0,
"duration2": 0,
"repeat": -1
},
{
"name": "Round 3",
"type": "Intervals - Zone",
"effort": "80% Effort",
"power1": 80,
"distance1": 0,
"duration1": 180,
"rest_effort": "65% Effort",
"power2": 65,
"distance2": 0,
"duration2": 120,
"repeat": 2
},
{
"name": "Rest 3",
"type": "Free Row/Paddle",
"effort": "Select...",
"power1": 0,
"distance1": 0,
"duration1": 60,
"rest_effort": "Select...",
"power2": 0,
"distance2": 0,
"duration2": 0,
"repeat": -1
},
{
"name": "Round 4a",
"type": "Intervals - Zone",
"effort": "65% Effort",
"power1": 65,
"distance1": 0,
"duration1": 120,
"rest_effort": "95% Effort",
"power2": 95,
"distance2": 0,
"duration2": 60,
"repeat": 0
},
{
"name": "Round 4b",
"type": "Intervals - Zone",
"effort": "80% Effort",
"power1": 80,
"distance1": 0,
"duration1": 120,
"rest_effort": "80% Effort",
"power2": 80,
"distance2": 0,
"duration2": 60,
"repeat": 0
},
{
"name": "Round 4c",
"type": "Intervals - Zone",
"effort": "65% Effort",
"power1": 65,
"distance1": 0,
"duration1": 120,
"rest_effort": "95% Effort",
"power2": 95,
"distance2": 0,
"duration2": 60,
"repeat": 0
},
{
"name": "Round 4d",
"type": "Intervals - Zone",
"effort": "80% Effort",
"power1": 80,
"distance1": 0,
"duration1": 30,
"rest_effort": "80% Effort",
"power2": 80,
"distance2": 0,
"duration2": 30,
"repeat": 0
},
{
"name": "Rest 4",
"type": "Free Row/Paddle",
"effort": "Select...",
"power1": 0,
"distance1": 0,
"duration1": 60,
"rest_effort": "Select...",
"power2": 0,
"distance2": 0,
"duration2": 0,
"repeat": -1
},
{
"name": "Round 5",
"type": "Intervals - Zone",
"effort": "80% Effort",
"power1": 80,
"distance1": 0,
"duration1": 180,
"rest_effort": "65% Effort",
"power2": 65,
"distance2": 0,
"duration2": 120,
"repeat": 2
},
{
"name": "Rest 5",
"type": "Free Row/Paddle",
"effort": "Select...",
"power1": 0,
"distance1": 0,
"duration1": 60,
"rest_effort": "Select...",
"power2": 0,
"distance2": 0,
"duration2": 0,
"repeat": -1
},
{
"name": "Round 6a",
"type": "Intervals - Zone",
"effort": "65% Effort",
"power1": 65,
"distance1": 0,
"duration1": 120,
"rest_effort": "95% Effort",
"power2": 95,
"distance2": 0,
"duration2": 60,
"repeat": 0
},
{
"name": "Round 6b",
"type": "Intervals - Zone",
"effort": "80% Effort",
"power1": 80,
"distance1": 0,
"duration1": 120,
"rest_effort": "80% Effort",
"power2": 80,
"distance2": 0,
"duration2": 60,
"repeat": 0
},
{
"name": "Round 6c",
"type": "Intervals - Zone",
"effort": "65% Effort",
"power1": 65,
"distance1": 0,
"duration1": 120,
"rest_effort": "95% Effort",
"power2": 95,
"distance2": 0,
"duration2": 60,
"repeat": 0
},
{
"name": "Round 6d",
"type": "Intervals - Zone",
"effort": "80% Effort",
"power1": 80,
"distance1": 0,
"duration1": 30,
"rest_effort": "80% Effort",
"power2": 80,
"distance2": 0,
"duration2": 30,
"repeat": 0
},
{
"name": "Rest 6",
"type": "Free Row/Paddle",
"effort": "Select...",
"power1": 0,
"distance1": 0,
"duration1": 60,
"rest_effort": "Select...",
"power2": 0,
"distance2": 0,
"duration2": 0,
"repeat": -1
},
{
"name": "Round 7",
"type": "Intervals - Zone",
"effort": "80% Effort",
"power1": 80,
"distance1": 0,
"duration1": 180,
"rest_effort": "65% Effort",
"power2": 65,
"distance2": 0,
"duration2": 120,
"repeat": 2
},
{
"name": "Rest 7",
"type": "Free Row/Paddle",
"effort": "Select...",
"power1": 0,
"distance1": 0,
"duration1": 60,
"rest_effort": "Select...",
"power2": 0,
"distance2": 0,
"duration2": 0,
"repeat": -1
},
{
"name": "Round 8a",
"type": "Intervals - Zone",
"effort": "65% Effort",
"power1": 65,
"distance1": 0,
"duration1": 120,
"rest_effort": "95% Effort",
"power2": 95,
"distance2": 0,
"duration2": 60,
"repeat": 0
},
{
"name": "Round 8b",
"type": "Intervals - Zone",
"effort": "80% Effort",
"power1": 80,
"distance1": 0,
"duration1": 120,
"rest_effort": "80% Effort",
"power2": 80,
"distance2": 0,
"duration2": 60,
"repeat": 0
},
{
"name": "Round 8c",
"type": "Intervals - Zone",
"effort": "65% Effort",
"power1": 65,
"distance1": 0,
"duration1": 120,
"rest_effort": "95% Effort",
"power2": 95,
"distance2": 0,
"duration2": 60,
"repeat": 0
},
{
"name": "Round 8d",
"type": "Intervals - Zone",
"effort": "80% Effort",
"power1": 80,
"distance1": 0,
"duration1": 30,
"rest_effort": "80% Effort",
"power2": 80,
"distance2": 0,
"duration2": 30,
"repeat": 0
},
{
"name": "Rest 8",
"type": "Free Row/Paddle",
"effort": "Select...",
"power1": 0,
"distance1": 0,
"duration1": 60,
"rest_effort": "Select...",
"power2": 0,
"distance2": 0,
"duration2": 0,
"repeat": -1
},
{
"name": "Round 9",
"type": "Intervals - Zone",
"effort": "80% Effort",
"power1": 80,
"distance1": 0,
"duration1": 180,
"rest_effort": "65% Effort",
"power2": 65,
"distance2": 0,
"duration2": 120,
"repeat": 2
},
{
"name": "Rest 9",
"type": "Free Row/Paddle",
"effort": "Select...",
"power1": 0,
"distance1": 0,
"duration1": 60,
"rest_effort": "Select...",
"power2": 0,
"distance2": 0,
"duration2": 0,
"repeat": -1
},
{
"name": "Round 10a",
"type": "Intervals - Zone",
"effort": "65% Effort",
"power1": 65,
"distance1": 0,
"duration1": 120,
"rest_effort": "95% Effort",
"power2": 95,
"distance2": 0,
"duration2": 60,
"repeat": 0
},
{
"name": "Round 10b",
"type": "Intervals - Zone",
"effort": "80% Effort",
"power1": 80,
"distance1": 0,
"duration1": 120,
"rest_effort": "80% Effort",
"power2": 80,
"distance2": 0,
"duration2": 60,
"repeat": 0
},
{
"name": "Round 10c",
"type": "Intervals - Zone",
"effort": "65% Effort",
"power1": 65,
"distance1": 0,
"duration1": 120,
"rest_effort": "95% Effort",
"power2": 95,
"distance2": 0,
"duration2": 60,
"repeat": 0
},
{
"name": "Round 10d",
"type": "Intervals - Zone",
"effort": "80% Effort",
"power1": 80,
"distance1": 0,
"duration1": 30,
"rest_effort": "80% Effort",
"power2": 80,
"distance2": 0,
"duration2": 30,
"repeat": 0
}
]
}
Create your own custom workouts for Swelldone
0
{
"name": "5x20 min",
"duration": "Long",
"description": "5 x 20 minutes. 3min @ L2; 2min @ L3; 2min rest",
"email": "",
"exercises": [
{
"name": "Interval 1",
"type": "Intervals - Zone",
"effort": "65% Effort",
"power1": 65,
"distance1": 0,
"duration1": 180,
"rest_effort": "80% Effort",
"power2": 80,
"distance2": 0,
"duration2": 120,
"repeat": 4
},
{
"name": "Rest 1",
"type": "Free Row/Paddle",
"effort": "Select...",
"power1": 0,
"distance1": 0,
"duration1": 120,
"rest_effort": "Select...",
"power2": 0,
"distance2": 0,
"duration2": 0,
"repeat": -1
},
{
"name": "Interval 2",
"type": "Intervals - Zone",
"effort": "65% Effort",
"power1": 65,
"distance1": 0,
"duration1": 180,
"rest_effort": "80% Effort",
"power2": 80,
"distance2": 0,
"duration2": 120,
"repeat": 4
},
{
"name": "Rest 2",
"type": "Free Row/Paddle",
"effort": "Select...",
"power1": 0,
"distance1": 0,
"duration1": 120,
"rest_effort": "Select...",
"power2": 0,
"distance2": 0,
"duration2": 0,
"repeat": -1
},
{
"name": "Interval 3",
"type": "Intervals - Zone",
"effort": "65% Effort",
"power1": 65,
"distance1": 0,
"duration1": 180,
"rest_effort": "80% Effort",
"power2": 80,
"distance2": 0,
"duration2": 120,
"repeat": 4
},
{
"name": "Rest 3",
"type": "Free Row/Paddle",
"effort": "Select...",
"power1": 0,
"distance1": 0,
"duration1": 120,
"rest_effort": "Select...",
"power2": 0,
"distance2": 0,
"duration2": 0,
"repeat": -1
},
{
"name": "Interval 4",
"type": "Intervals - Zone",
"effort": "65% Effort",
"power1": 65,
"distance1": 0,
"duration1": 180,
"rest_effort": "80% Effort",
"power2": 80,
"distance2": 0,
"duration2": 120,
"repeat": 4
},
{
"name": "Rest 4",
"type": "Free Row/Paddle",
"effort": "Select...",
"power1": 0,
"distance1": 0,
"duration1": 120,
"rest_effort": "Select...",
"power2": 0,
"distance2": 0,
"duration2": 0,
"repeat": -1
},
{
"name": "Interval 5",
"type": "Intervals - Zone",
"effort": "65% Effort",
"power1": 65,
"distance1": 0,
"duration1": 180,
"rest_effort": "80% Effort",
"power2": 80,
"distance2": 0,
"duration2": 120,
"repeat": 4
}
]
}
Create your own custom workouts for Swelldone
0
{
"name": "PowerPerg",
"duration": "Short",
"description": "Power",
"email": "",
"exercises": [
{
"name": "Segment 1",
"type": "Intervals - Zone",
"effort": "125% Effort",
"power1": 125,
"distance1": 0,
"duration1": 20,
"rest_effort": "50% Effort",
"power2": 50,
"distance2": 0,
"duration2": 40,
"repeat": 6
}
]
}
Create your own custom workouts for Swelldone
E325EC
{ "name": "Real Rabit", "duration": "Medium", "description": "full Rabit Test", "email": "", "exercises": [ { "name": "warm up", "type": "For Time", "effort": "50% Effort", "power1": 50, "distance1": 0, "duration1": 600, "rest_effort": "Select...", "power2": 0, "distance2": 0, "duration2": 0, "repeat": -1 }, { "name": "10 min easy", "type": "For Time", "effort": "65% Effort", "power1": 65, "distance1": 0, "duration1": 600, "rest_effort": "Select...", "power2": 0, "distance2": 0, "duration2": 0, "repeat": -1 }, { "name": "1 min rest1", "type": "For Time", "effort": "50% Effort", "power1": 50, "distance1": 0, "duration1": 60, "rest_effort": "Select...", "power2": 0, "distance2": 0, "duration2": 0, "repeat": -1 }, { "name": "10 sec Sprint", "type": "For Time", "effort": "110% Effort", "power1": 110, "distance1": 0, "duration1": 10, "rest_effort": "Select...", "power2": 0, "distance2": 0, "duration2": 0, "repeat": -1 }, { "name": "50 sec rest", "type": "For Time", "effort": "50% Effort", "power1": 50, "distance1": 0, "duration1": 50, "rest_effort": "Select...", "power2": 0, "distance2": 0, "duration2": 0, "repeat": -1 }, { "name": "5 min Medium", "type": "For Time", "effort": "80% Effort", "power1": 80, "distance1": 0, "duration1": 300, "rest_effort": "Select...", "power2": 0, "distance2": 0, "duration2": 0, "repeat": -1 }, { "name": "1 min Rest2", "type": "For Time", "effort": "50% Effort", "power1": 50, "distance1": 0, "duration1": 60, "rest_effort": "Select...", "power2": 0, "distance2": 0, "duration2": 0, "repeat": -1 }, { "name": "3 Min Very Hard", "type": "For Time", "effort": "95% Effort", "power1": 95, "distance1": 0, "duration1": 180, "rest_effort": "Select...", "power2": 0, "distance2": 0, "duration2": 0, "repeat": -1 }, { "name": "1 min Rest3", "type": "For Time", "effort": "50% Effort", "power1": 50, "distance1": 0, "duration1": 60, "rest_effort": "Select...", "power2": 0, "distance2": 0, "duration2": 0, "repeat": -1 }, { "name": "30 sec Sprint", "type": "For Time", "effort": "110% Effort", "power1": 110, "distance1": 0, "duration1": 30, "rest_effort": "Select...", "power2": 0, "distance2": 0, "duration2": 0, "repeat": -1 }, { "name": "1 min Rest4", "type": "For Time", "effort": "50% Effort", "power1": 50, "distance1": 0, "duration1": 60, "rest_effort": "Select...", "power2": 0, "distance2": 0, "duration2": 0, "repeat": -1 }, { "name": "10 min Easy2", "type": "For Time", "effort": "65% Effort", "power1": 65, "distance1": 0, "duration1": 600, "rest_effort": "Select...", "power2": 0, "distance2": 0, "duration2": 0, "repeat": -1 } ]}
Create your own custom workouts for Swelldone
0
{
"name": "Real Rabit",
"duration": "Medium",
"description": "full Rabit Test",
"email": "",
"exercises": [
{
"name": "warm up",
"type": "For Time",
"effort": "50% Effort",
"power1": 50,
"distance1": 0,
"duration1": 600,
"rest_effort": "Select...",
"power2": 0,
"distance2": 0,
"duration2": 0,
"repeat": -1
},
{
"name": "10 min easy",
"type": "For Time",
"effort": "65% Effort",
"power1": 65,
"distance1": 0,
"duration1": 600,
"rest_effort": "Select...",
"power2": 0,
"distance2": 0,
"duration2": 0,
"repeat": -1
},
{
"name": "1 min rest1",
"type": "For Time",
"effort": "50% Effort",
"power1": 50,
"distance1": 0,
"duration1": 60,
"rest_effort": "Select...",
"power2": 0,
"distance2": 0,
"duration2": 0,
"repeat": -1
},
{
"name": "10 sec Sprint",
"type": "For Time",
"effort": "110% Effort",
"power1": 110,
"distance1": 0,
"duration1": 10,
"rest_effort": "Select...",
"power2": 0,
"distance2": 0,
"duration2": 0,
"repeat": -1
},
{
"name": "50 sec rest",
"type": "For Time",
"effort": "50% Effort",
"power1": 50,
"distance1": 0,
"duration1": 50,
"rest_effort": "Select...",
"power2": 0,
"distance2": 0,
"duration2": 0,
"repeat": -1
},
{
"name": "5 min Medium",
"type": "For Time",
"effort": "80% Effort",
"power1": 80,
"distance1": 0,
"duration1": 300,
"rest_effort": "Select...",
"power2": 0,
"distance2": 0,
"duration2": 0,
"repeat": -1
},
{
"name": "1 min Rest2",
"type": "For Time",
"effort": "50% Effort",
"power1": 50,
"distance1": 0,
"duration1": 60,
"rest_effort": "Select...",
"power2": 0,
"distance2": 0,
"duration2": 0,
"repeat": -1
},
{
"name": "3 Min Very Hard",
"type": "For Time",
"effort": "95% Effort",
"power1": 95,
"distance1": 0,
"duration1": 180,
"rest_effort": "Select...",
"power2": 0,
"distance2": 0,
"duration2": 0,
"repeat": -1
},
{
"name": "1 min Rest3",
"type": "For Time",
"effort": "50% Effort",
"power1": 50,
"distance1": 0,
"duration1": 60,
"rest_effort": "Select...",
"power2": 0,
"distance2": 0,
"duration2": 0,
"repeat": -1
},
{
"name": "30 sec Sprint",
"type": "For Time",
"effort": "110% Effort",
"power1": 110,
"distance1": 0,
"duration1": 30,
"rest_effort": "Select...",
"power2": 0,
"distance2": 0,
"duration2": 0,
"repeat": -1
},
{
"name": "1 min Rest4",
"type": "For Time",
"effort": "50% Effort",
"power1": 50,
"distance1": 0,
"duration1": 60,
"rest_effort": "Select...",
"power2": 0,
"distance2": 0,
"duration2": 0,
"repeat": -1
},
{
"name": "10 min Easy2",
"type": "For Time",
"effort": "65% Effort",
"power1": 65,
"distance1": 0,
"duration1": 600,
"rest_effort": "Select...",
"power2": 0,
"distance2": 0,
"duration2": 0,
"repeat": -1
}
]
}
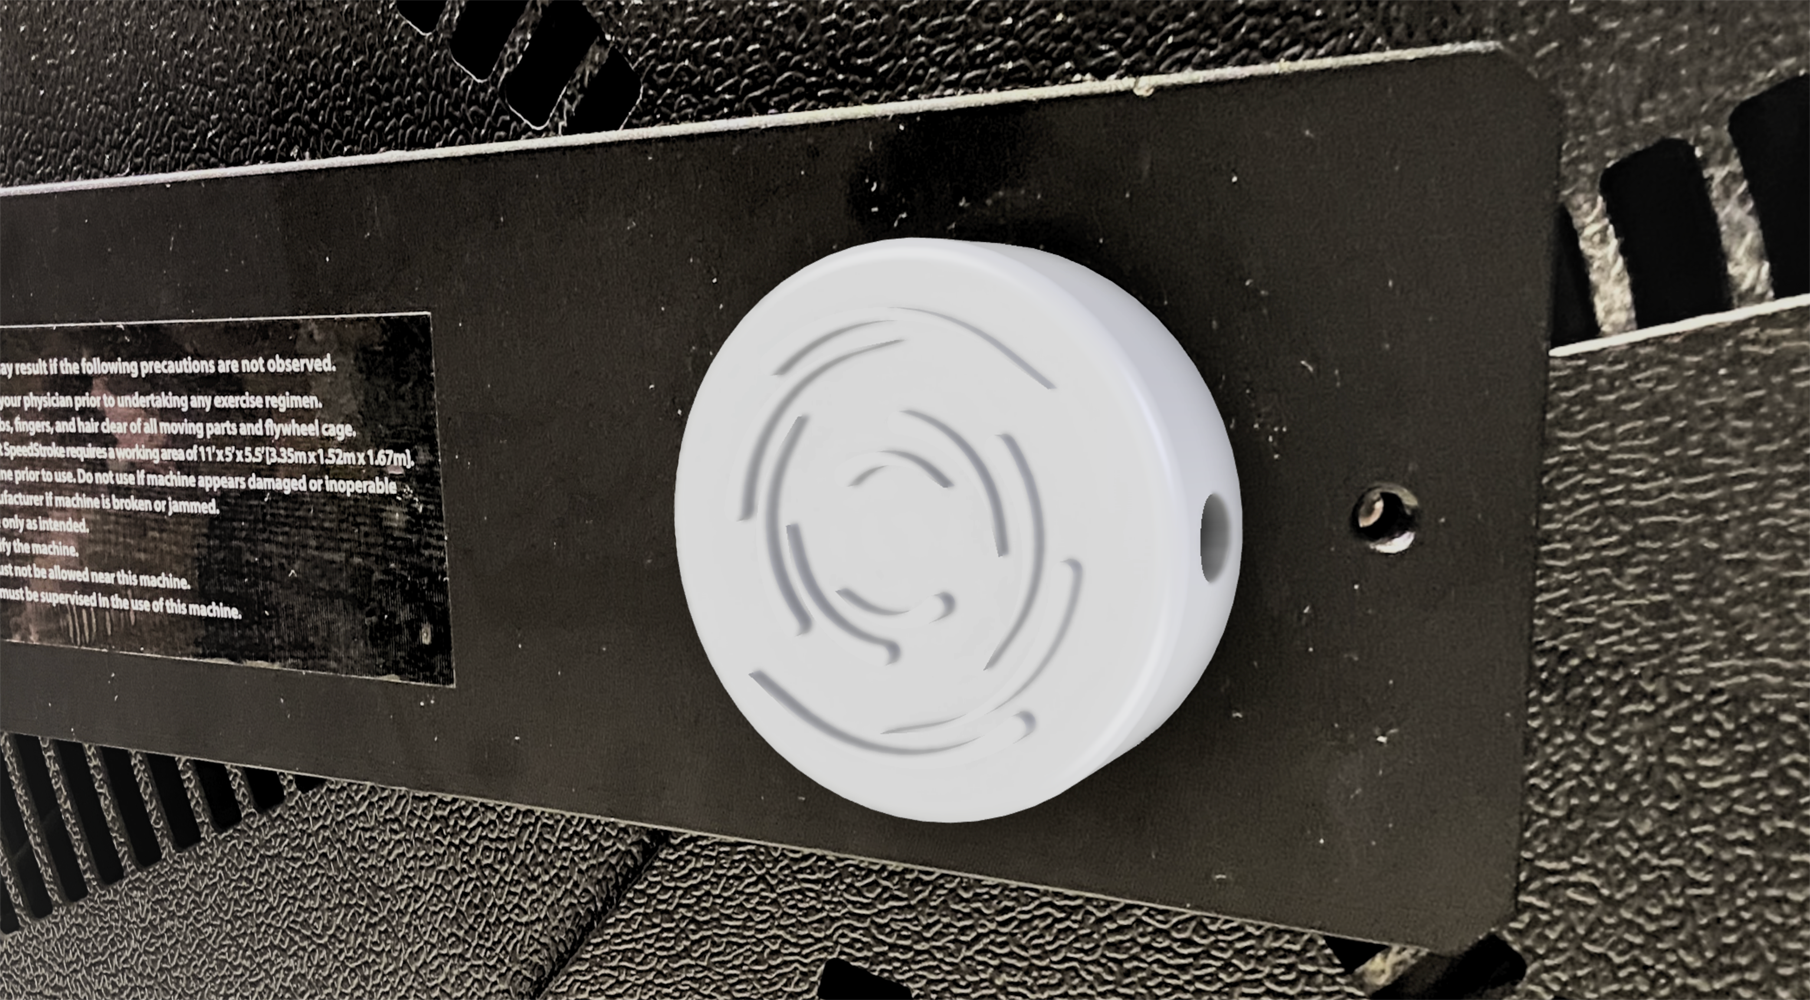
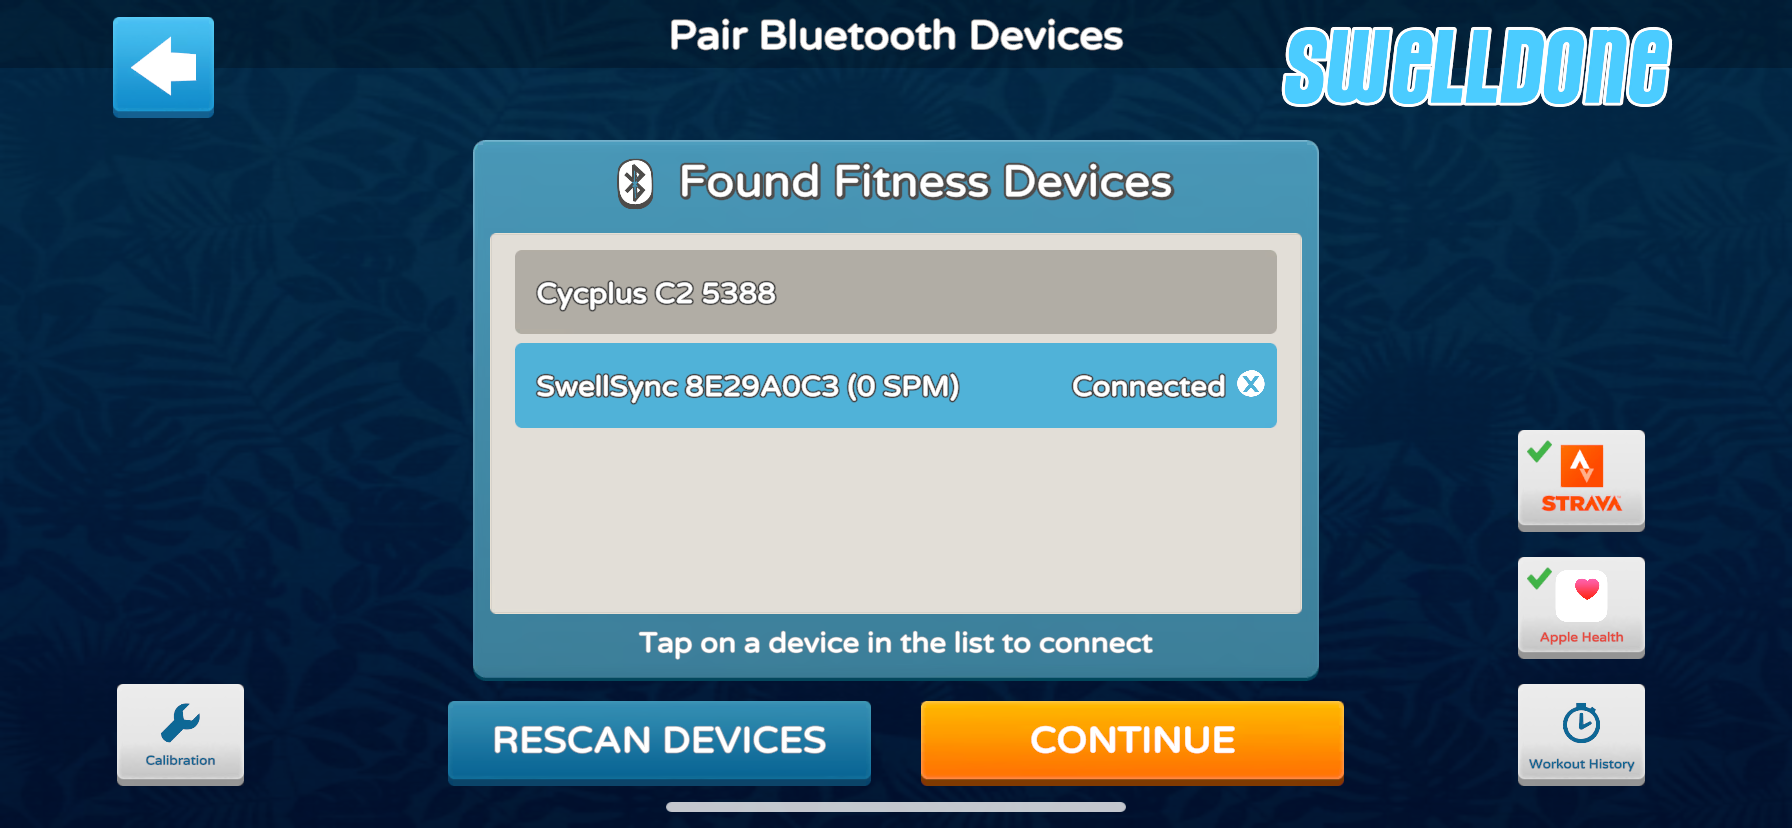
If you are unable to see the SwellSync monitor for pairing in Bluetooth scans, it is probably because the monitor is asleep. The SwellSync monitor will auto-sleeps after 3 minutes if there are no devices connected via Bluetooth or web browser.
When the unit is asleep, it will wake when it detects the flywheel spinning - so give your erg a tug before you are ready to pair.
To check the current status of the SwellSync monitor, look inside the charging opening for LED lights:
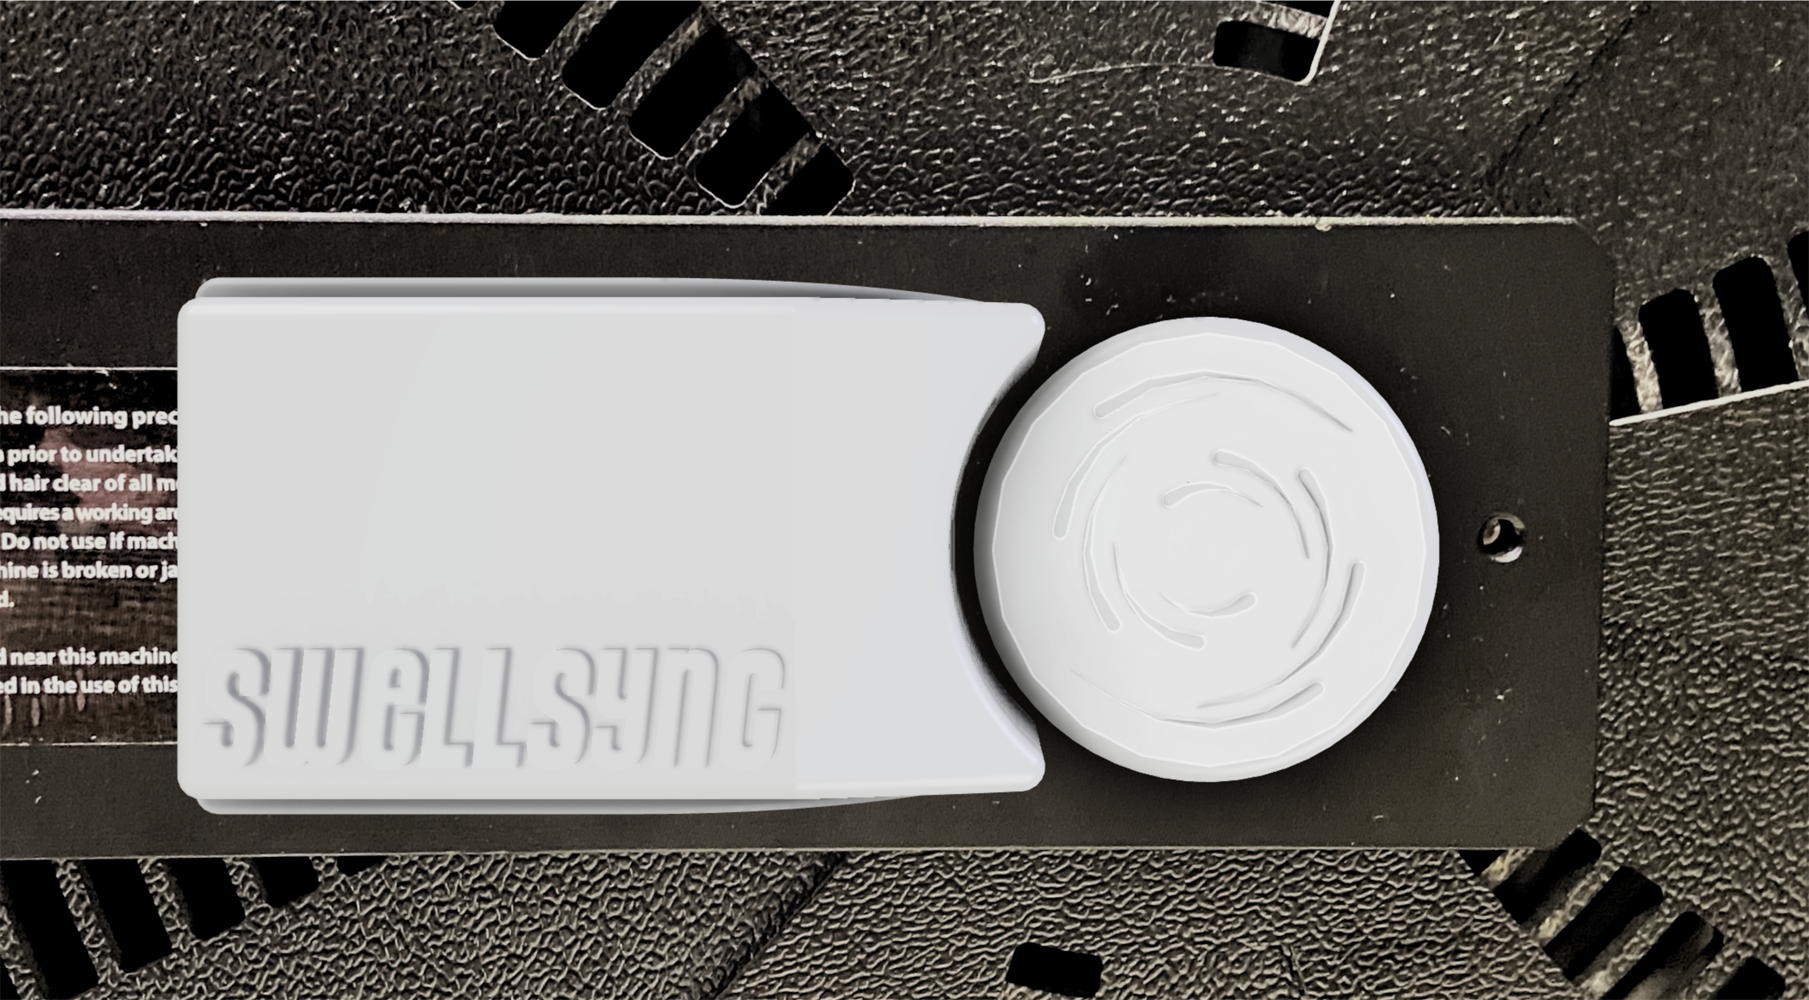
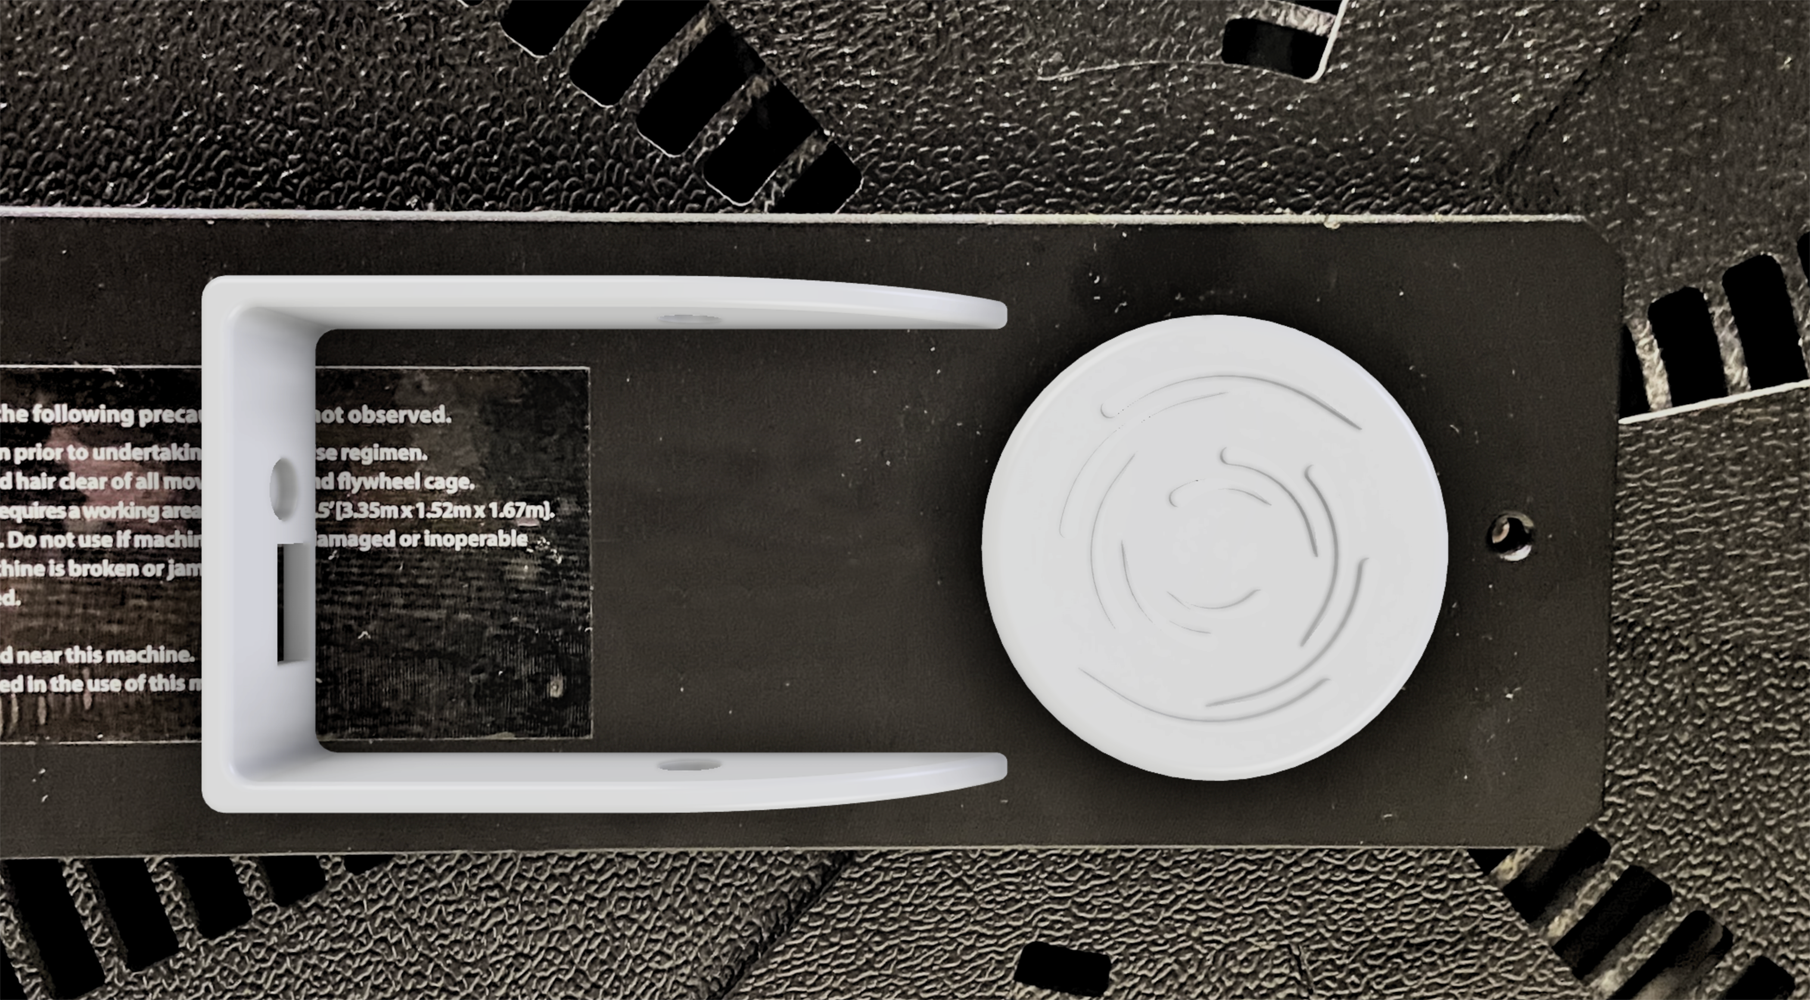
The SwellSync monitor comes with an internal battery and it should run for hours on full charge. To charge, you can plug in the micro USB cable into the back of the unit while seated in or outside of the dock.
The SwellSync monitor will auto-sleeps after 3 minutes if there are no devices connected via Bluetooth or web browser.
When the unit is asleep, it will wake when it detects the flywheel spinning - so give your erg a tug before you are ready to pair.
To check the current status of the SwellSync monitor, look inside the charging opening for LED lights:
The SwellSync monitor can be accessed via a web browser to observe performance metrics without needing to use the Swelldone app. To enable the web interface, however, you must use the Swelldone app to configure the Wi-Fi connection.

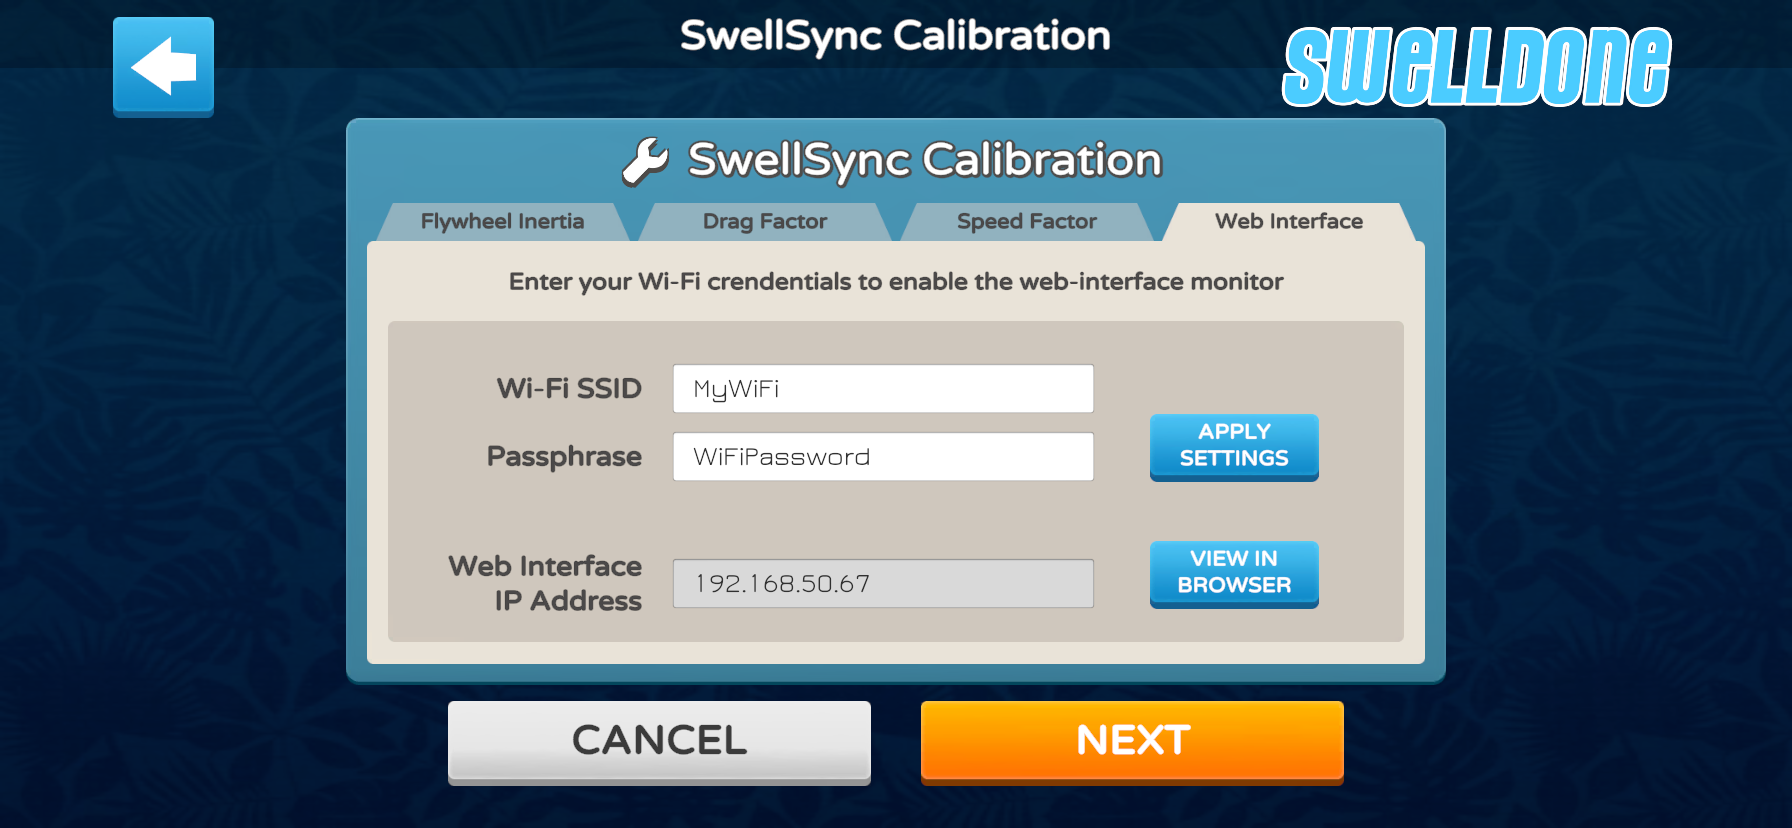
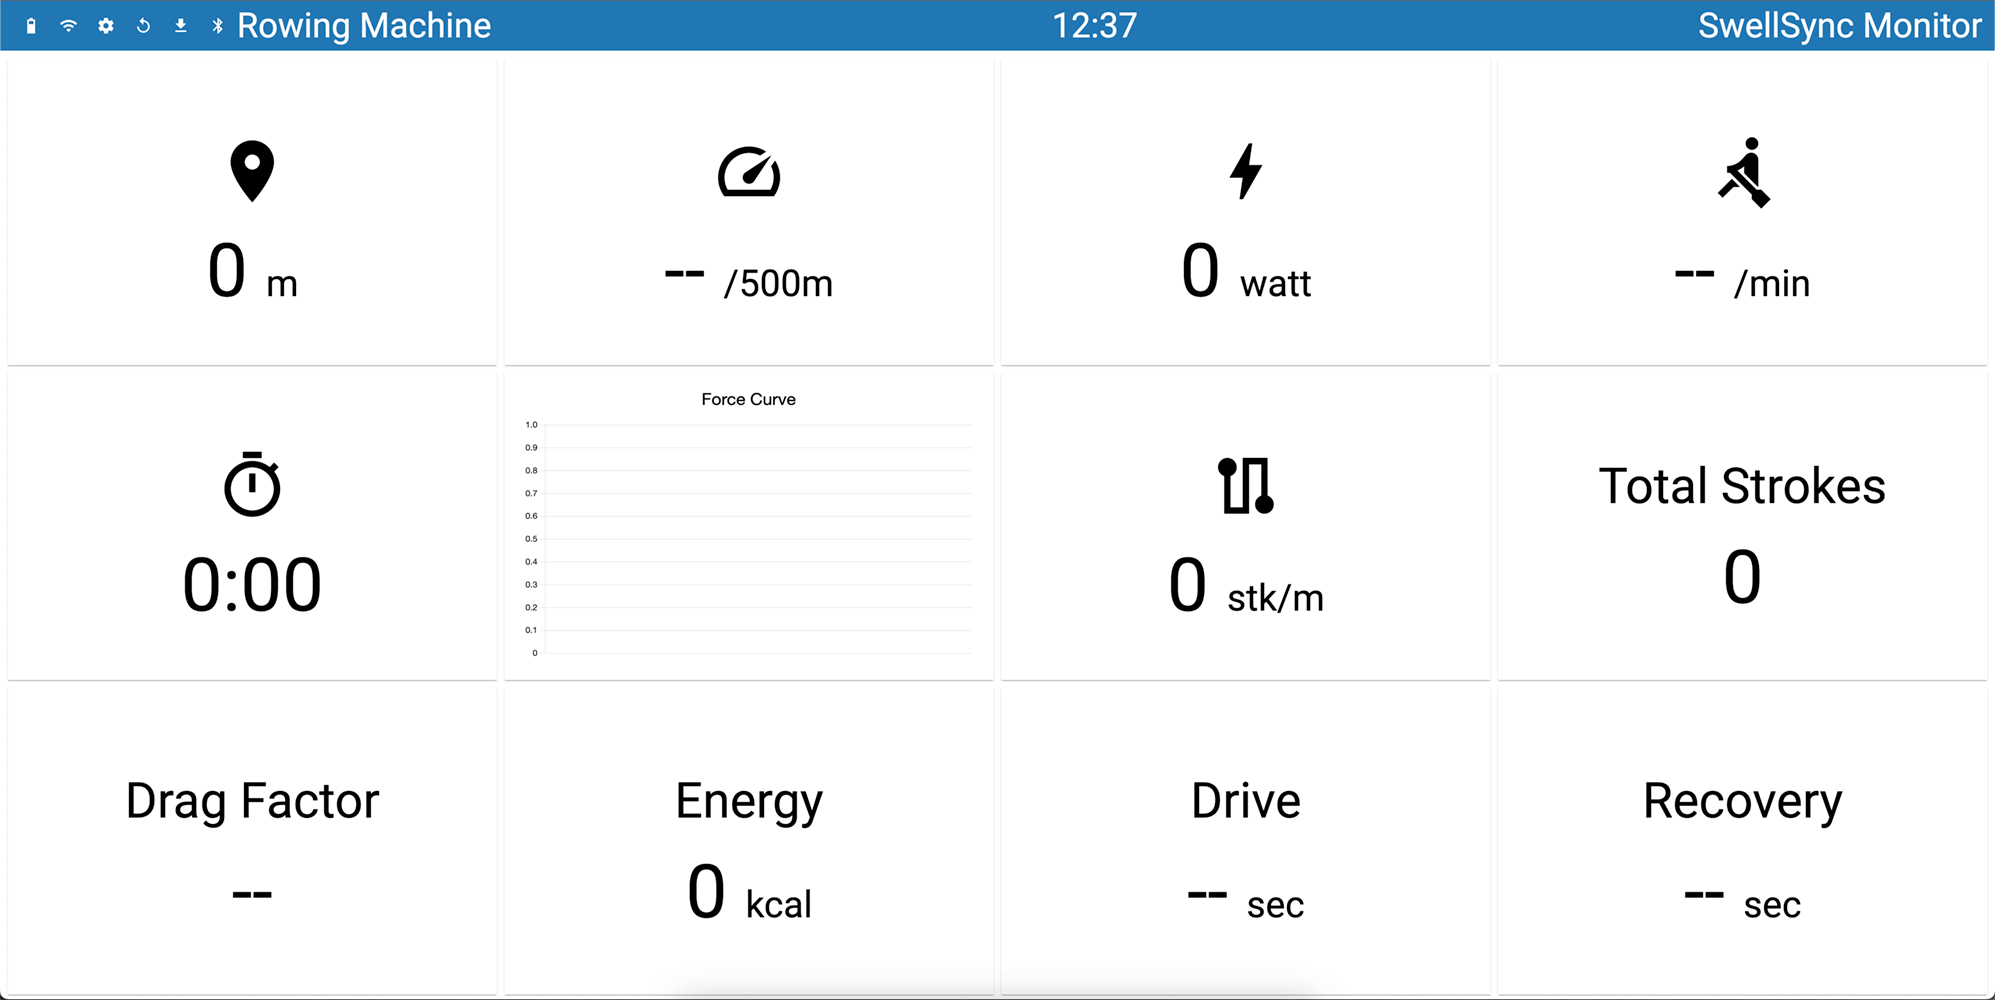
The web-interface reports additional detailed measurements for the erg, including stroke drive and recovery phases as well as a force curve.
If you find that SwellSync is not producing readings accurate to your erg's performance, it's possible to configure and calibrate the monitor to fit your erg's mechanics.
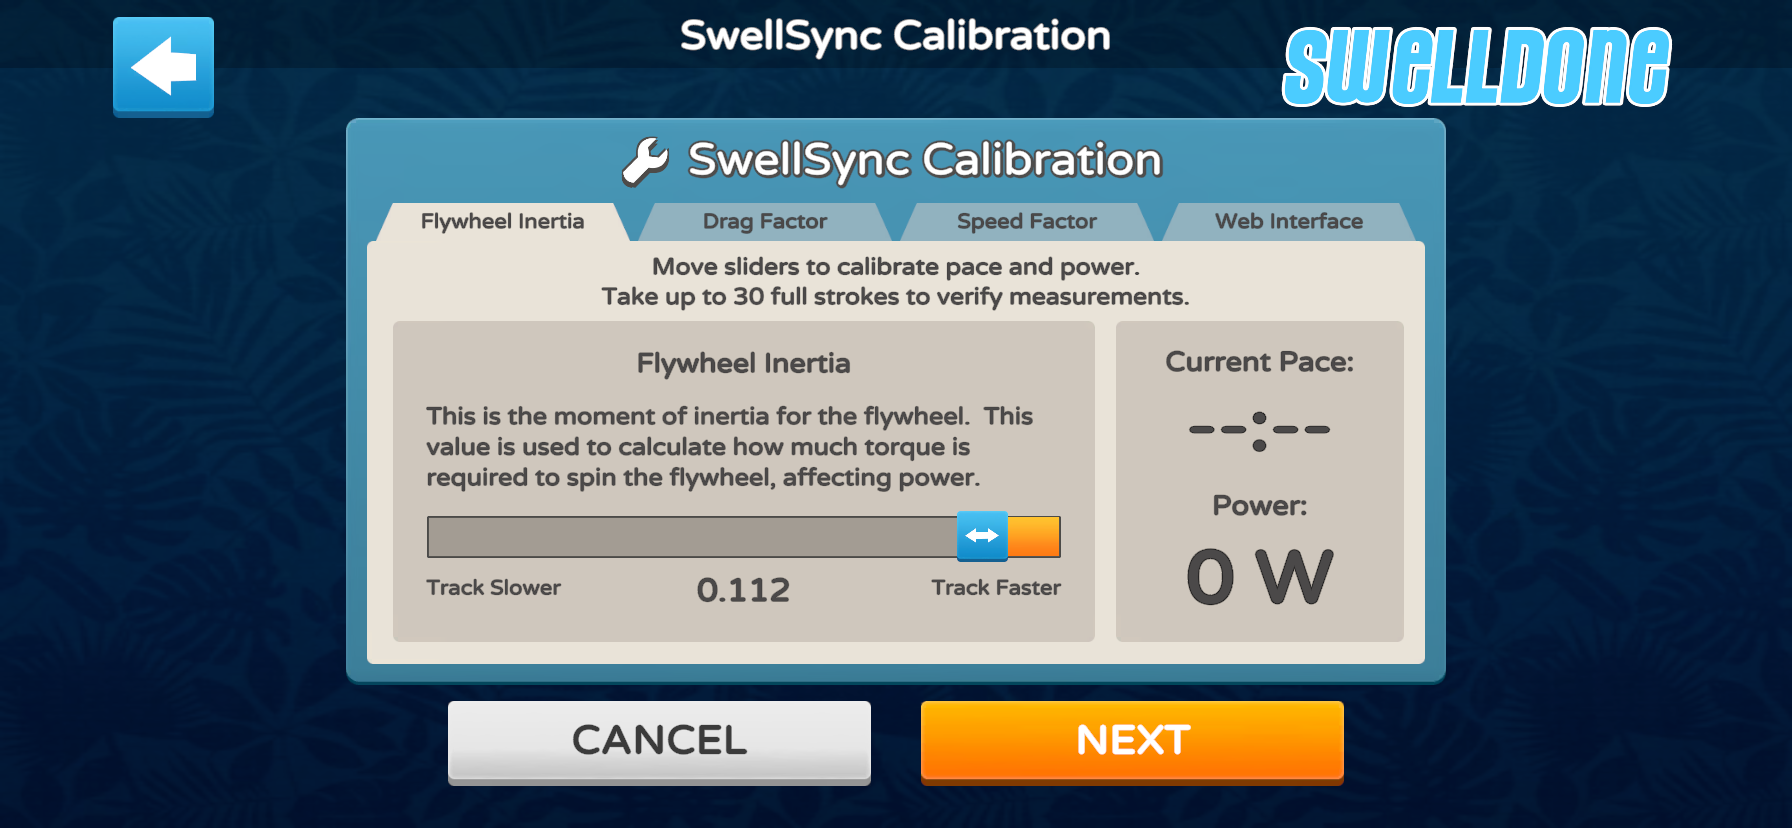
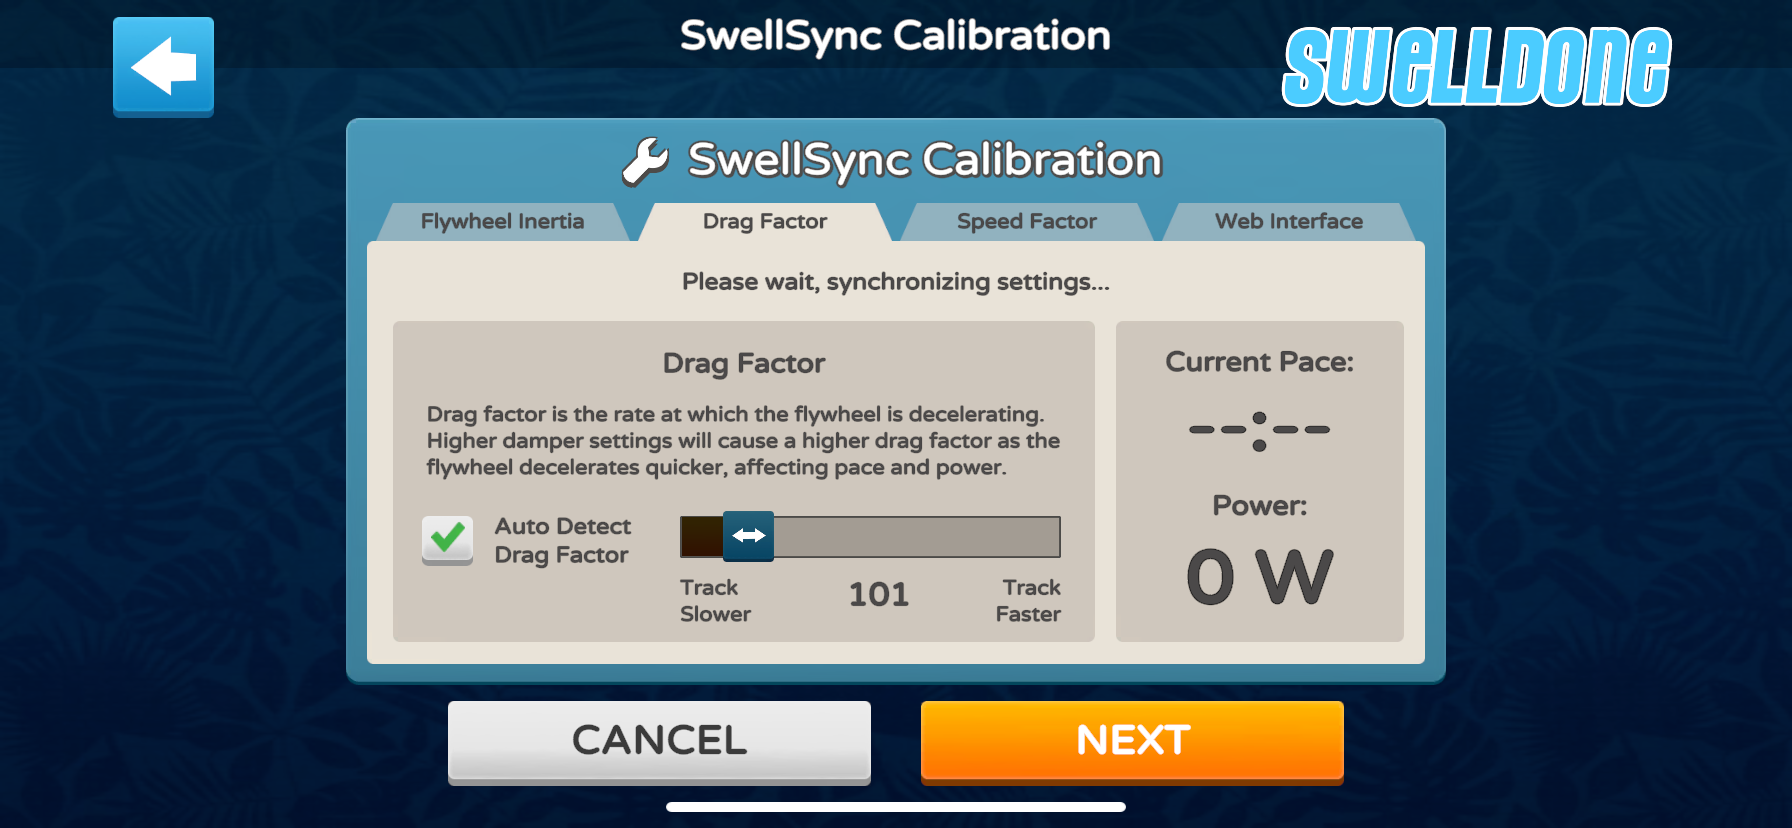
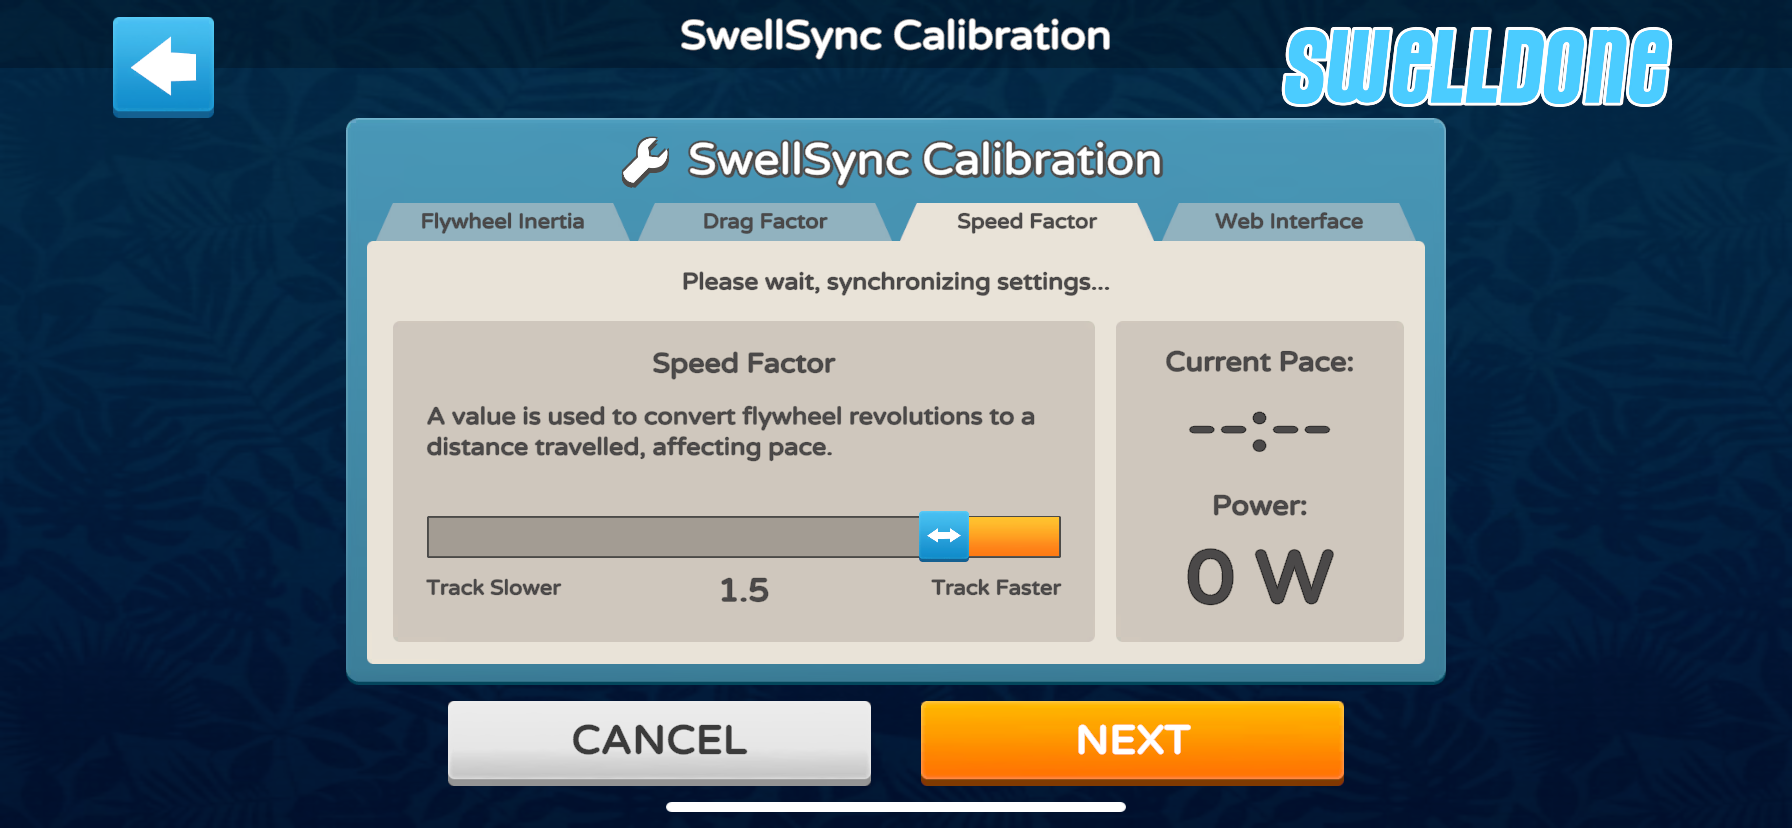
After updating any setting in the SwellSync configuration pages, the monitor is expected to restart momentarily and reconnect to the app. To observe the current measurements, you may paddle/row on the erg to view the readouts on the right side of the screen to compare with the legacy monitor or some other benchmark.
When done with the configuration and calibration process, you may want to restart the Swelldone app and reconnect to SwellSync to ensure all changes are applied and data is flowing properly.
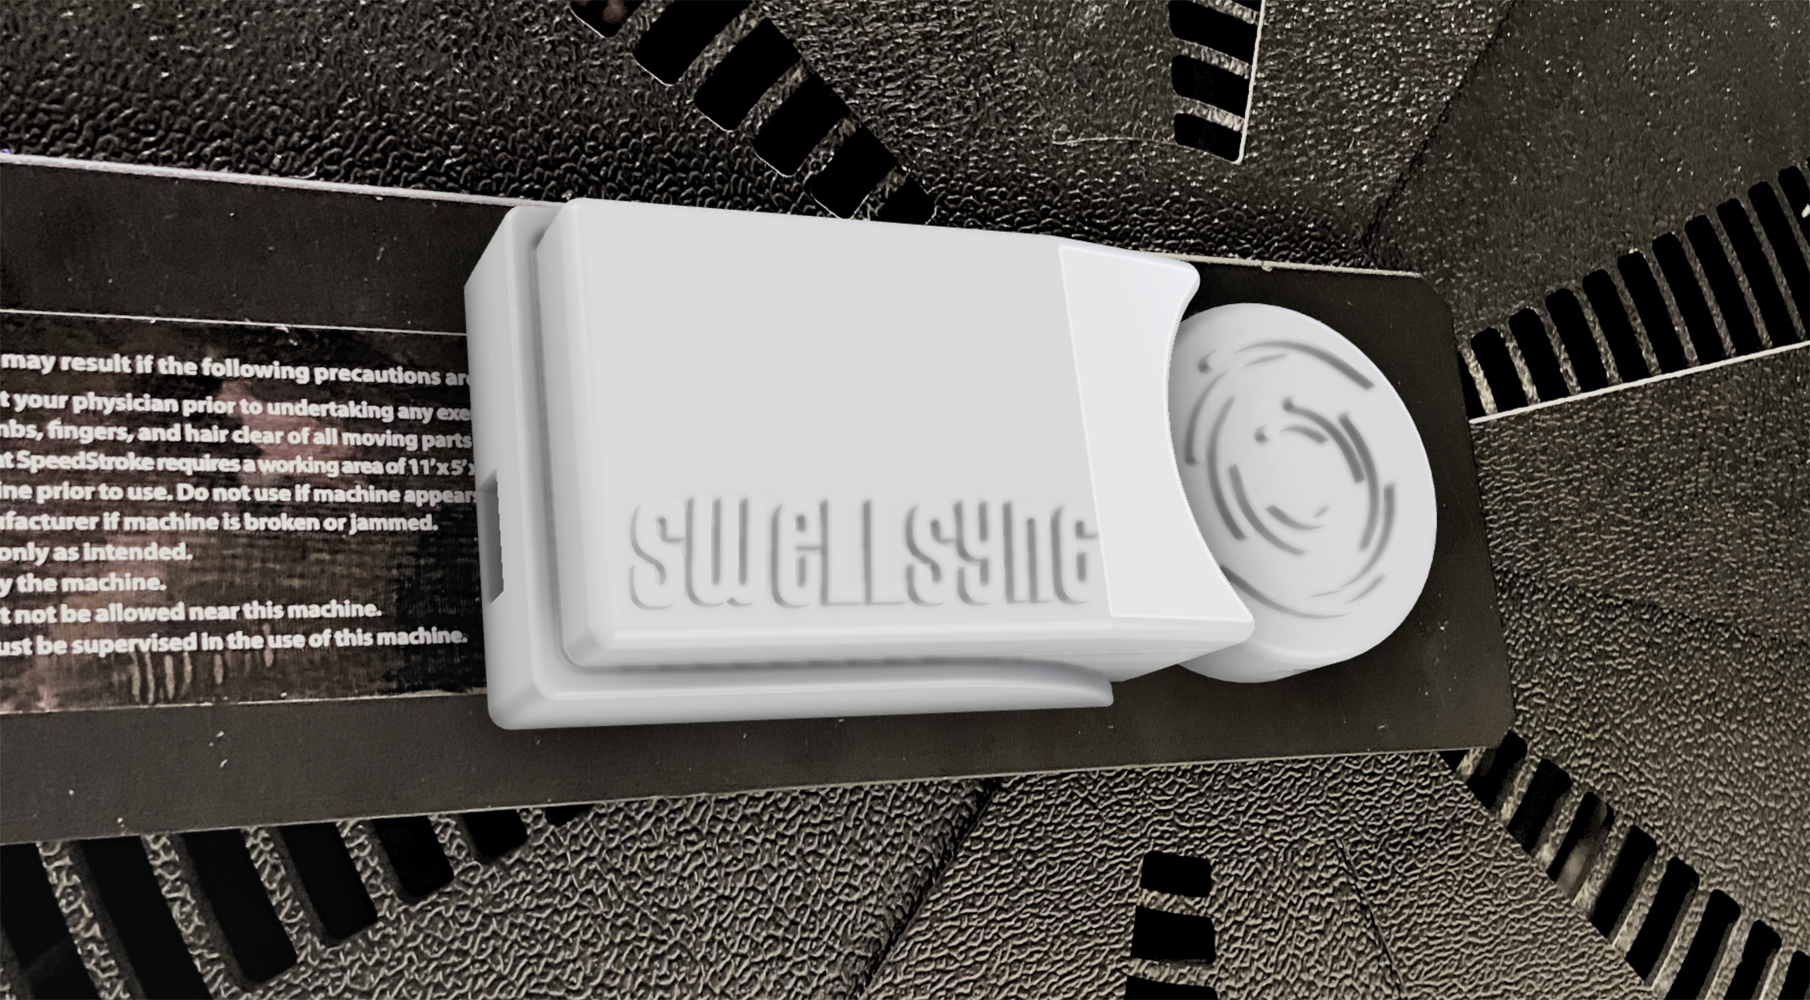
To install the SwellSync monitor on to your erg, you will need access to the flywheel shaft.